![]()
Compositie
Snijplotters + Snijplotter Software
E-mail prayer
Room of Possibilities
Tijdzones
Marmeren op vloerwax
October 2006
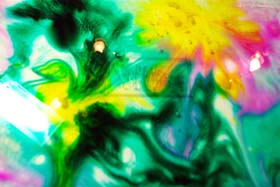
Frog in a Blender Tutorial
Technique Junkie Robin Caldwell came up with (and named) this cool technique. In
addition to (or in place of) the color wash sprays, you can add walnut ink,
alcohol ink and other coloring additives -- the Future Floor Finish is heavy
enough to suspend the coloring. Try it with different paper types, too. Each has
unique results! Robin strongly recommends alcohol inks for fabulous color
intensity!
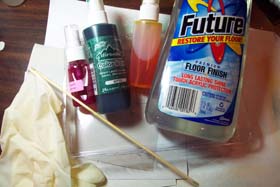 |
Wat je nodig hebt: Future Floor Finish - Color Wash Sprays and/or Walnut ink, Alcohol Inks, Metallic Ink Additives - Disposable Container (slightly larger than cardstock) - Cardstock (matte, glossy, colored - any!) - Wooden Skewer or Thin Stick - Rubber Gloves (optional) - Large Paper Sheet for Drying
|
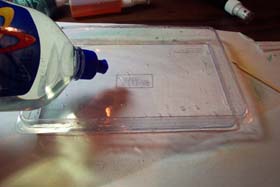 |
fill the base of the container with floor wax to a 1/2 inch diepte |
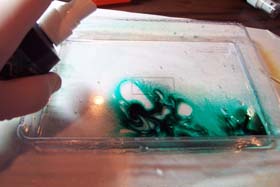 |
Handschoenen aan. spray de eerste kleur in de wax. |
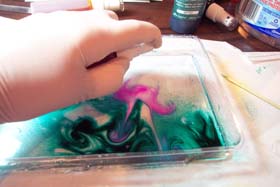 |
voeg andere kleuren toe, met een beetje afstand tussen de kleuren zodat het geen modder wordt. |
 |
gebruik sate prikkers om de kleuren te laten marbelen. |
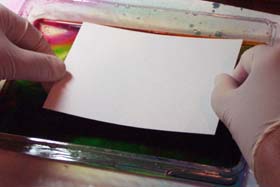 |
dip het papier recht naar beneden op het water |
| til het papier op en draai onmiddelijk om. laat vloeistof en kleur niet naar de randen of ervanaf lopen. | |
| plat op schoon papier laten drogen. | |
| trisch bee |
For these backgrounds I used ordinary floor wax, in the UK it goes under the brand of Johnsons Klear and can be bought in all the big supermarkets. Other side of the pond its known as Future Floor Finish. These backgrounds are very messy to make – but hey thats all part of the fun ya know ;) Read on for details on how you can make em: What You Need: * Floor Wax * Alcohol Inks * Plastic Container – I used a washing up bowl * Plastic Cling Wrap/Film * Glossy Card (cut sheets so they fit inside plastic container/bowl) * Heat Gun (for drying) * Newspaper (for laying finished backgrounds on to dry)
How To Create: 1. Place the plastic wrap inside the plastic bowl to protect the bottom of the bowl as the inks will stain. 2. Pour a generous amount of floor wax in the container, you want just enough wax to cover the base of the container. 3. Next take your alcohol inks and gently drop ink from the bottles – you don't need a lot as the inks disperse in the wax. Do not completely cover the surface with ink, allow spaces in between drops so that the drops can blend together and create interesting patterns. I use approve 2-3 different colors for this. 4. Take your gloss card and place over the inks, gently tap, then lift off, allow the inks and wax on your card to move around to create texture and movement. Then place on your newspaper to dry out. You can speed along the drying process with an heat gun if you prefer. Your background is complete. You can now place more card onto the ink and wax mix in the container to lift off more background color. I keep doing this until there is no ink left. Then I add more wax and ink to replenish and make more backgrounds. Once dry you can stamp and use your backgrounds in your artwork. I find Brilliance inkpad works best when stamping on the waxy surface as it doesn't bubble like dye inks do.
|